Print, Scan, Fax
Print stations are available in all libraries, including Anywhere Library. Print in color and black & white, send a fax, scan a document or make copies.
Printing
Printing is a 2-step process.
- Upload (share) your print jobs to Pharos My Print Center.
- Release (print) your print jobs at any branch print station.
Step 1: Upload (share) Your Print Job
-
Before you can print, you need to upload (share) the files you'd like to print to the library’s printing system. This stores your files so they're ready to be released (printed) at any branch print station.
You can do this in several ways — choose the option that works best for you:
- From a Library Computer
- Remotely from your own device via
Note: Uploaded files remain available in the system for 24 hours.
Click the links above for step-by-step instructions.
-
When you click Print from a library computer, the document or webpage is automatically uploaded to your Pharos My Print Center account.
-
Upload print job to Pharos My Print Center
- Open the file or webpage that you would like to print.
- Open the Print menu (File menu > Print or keyboard shortcut: Ctrl+P).
- Check Print Settings: make sure paper size is set to one we stock (8.5x11, 8.5x14, 11x17) to avoid printing errors.
- Click Print to upload the file to My Print Center.
-
Release your print job
- Follow the steps in “How do I print (release) my files at the print station?”
-
Upload print job to Pharos My Print Center
-
- Visit printing.trl.org.
- Log in with your library card number and PIN.
- Click UPLOAD and select your document on your device.
- Adjust print settings in the lower-right corner.
- Repeat for multiple documents.
-
Send the files wish to print as attachments (otherwise, the email message will print) to printing@trl.org.
-
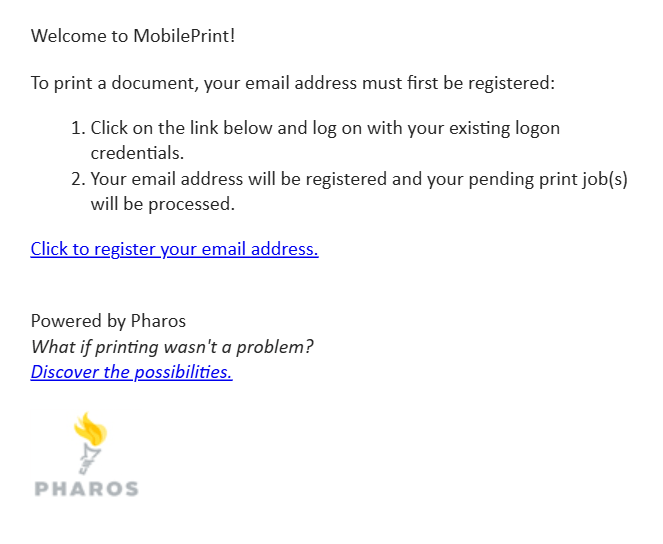
If your email address is already in the Pharos system:
You’ll receive a confirmation email showing your documents are ready for release. Go to your library to release your print jobs. -
If your email address is not in the Pharos system:
You’ll receive an email with a link to complete email registration (see below).
How do I register my email address for printing?
Requirements:
- You must have logged in to Pharos My Print Center at least once using your library card and PIN.
- You may register multiple email addresses.
To register your email:
- From your email account, send an email to printing@trl.org.
- You’ll receive a message with a registration link.
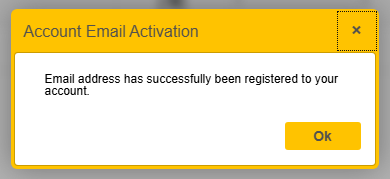
- Click on the Click to register your email address link. You will be redirected to the Pharos Print Center website.
- Log in with your library barcode and PIN. You will receive a message 'Email address has successfully been registered to your account'.
- Click OK.
Your email address will be added to the database and the next time you submit your documents via email, you will receive a reply email showing that your documents are ready for release.
-
If your email address is already in the Pharos system:
-
- Download the Pharos Print app (iOS and Android).
- On the configuration screen:
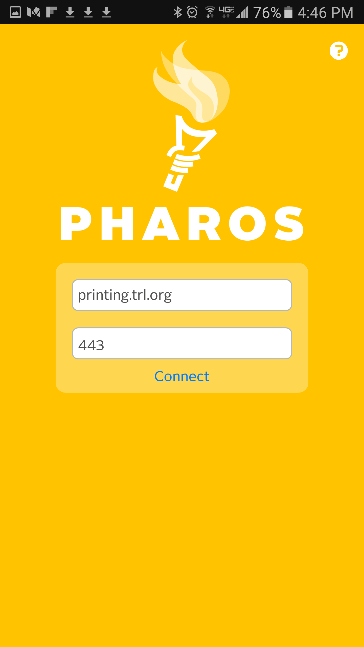
- Server: printing.trl.org
- Port: 443
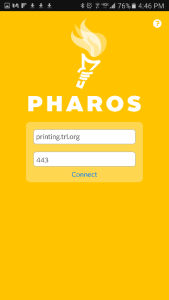
Example of the configuration screen when you open the app for the first time.
- Log in with your library card number and PIN.
- Click UPLOAD and choose your document on your device.
- Adjust print settings at the lower right corner of the screen.
- Repeat for additional documents.
Step 2: Release (print) Your Print Job
-
If you haven’t uploaded your files yet, complete the steps in “How do I upload my files for printing?” first.
At any print station:
- Log in with your library card number and PIN.
- Select Pharos Print Release.
- Choose your document(s) and press Print.
- Log out when finished.
-
The QR code that is attached to the print stations allows you to release your print jobs from your mobile device with the Pharos Print app.
Step 1: Download the Pharos Print app
- Download the Pharos Print app for your Android or iPhone smartphone.
- Enter the TRL Print Center web address: printing.trl.org and port number 443.
- Login with your TRL card number and PIN.
- Allow access to your phone’s camera.
The Pharos Print app is now ready to use! You can edit print job properties, preview the jobs in the queue, review the cost of each print and select print jobs to release.
Step 2: Scan the QR code
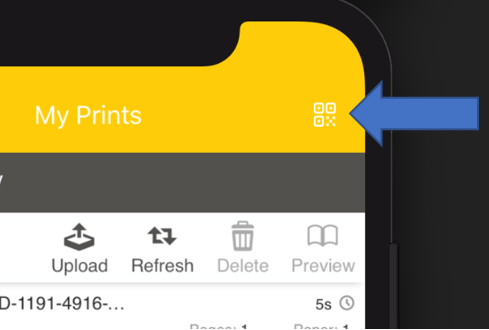
When you’re ready to release your print jobs, you can now use the QR Code option:
- Simply tap the QR icon in the app:
-
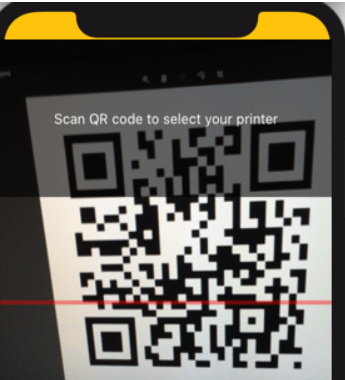
Then point at the QR code that is attached to the printer:
- Then press Confirm. All selected documents will print automatically. There is no need to touch the printer control panel to release the documents.
Printing Costs & Accepted Formats
-
Each month, your library card receives a $20 credit for printing and copying. Unused credit does not roll over. (see “How Your Pharos Printing Balance Works”)
To view your available printing balance login at printing.trl.org with your library card number and PIN.
Printing Costs:
Letter (8.5"x11") and Legal (8.5"x14")
- Black & White: $0.10 per side
- Color: $0.50 per side
Tabloid/Ledger (11"x17")
- Black & White: $0.20 per side
- Color: $1.00 per side
If your print job exceeds your available funds, you may pay for the difference. Please speak with library staff in advance of releasing your print job.
-
No, library printers are set up to use the paper provided in the machines to ensure consistent print quality and prevent damage or paper jams.
For this reason, personal paper (including specialty, colored, or thicker paper) cannot be loaded into library printers. If you need to print on a specific type of paper, we recommend using a personal printer or a local print shop. Library staff are always happy to help you explore the best option for your needs.
-
The following document types can be uploaded and printed:
Word - .DOC, .DOCX and .RTF files
Excel - .XLS and .XLSX files
PowerPoint - .PPT and .PPTX files
PDF - .PDF files
Text - .TXT files
Images - BMP, GIF, JPG, PNG and TIF files
Your Printing Balance Explained
-
My Funds shows your total available printing balance. It combines two "purses" in My Print Center:
- Free Balance ($20 monthly credit)
- User Funds (negative balance)
Formula:
My Funds = Free Balance + User Funds
Monthly Reset
One the 1st open day of each month:
- Free Balance: resets to $20
- User Funds: If a negative balance exists, up to $20 is automatically applied from Free Balance
- Your balances are updated automatically
Example 1: Small Negative Balance
If you end the month with –$5 in User Funds:
- Free Balance resets to $20
-
$5 is applied to your negative User Funds
- User Funds becomes $0
- Free Balance becomes $15
My Funds = $15
Example 2: Larger Negative Balance
If you have a -$100 User Funds balance:
- Each month, your $20 Free Balance is automatically applied to the negative amount
- The remaining balance is reduced incrementally over multiple months
- Updated balances are visible each month
See the FAQ How does the print balance work? more information.
-
Our printing system uses two internal accounts (called “purses”) to calculate the amount you can print (called "My Funds").
The Two "Purses"
-
Free Balance
- Includes your monthly $20.00 printing credit from TRL.
- Resets to $20.00 on the 1st of each month (or the first open day).
- Once this balance reaches $0, any additional printing or copying costs are taken from the User Funds purse (see below).
-
User Funds
- Tracks any amount owed if you exceed your available balance (displayed as a negative balance).
- If a negative balance exists, up to $20 is automatically applied from Free Balance on the 1st of each month (or first open day)
My Funds: The Total Combined Balance
The two purses are combined to calculate the total amount available for printing and is displayed as My Funds.
- My Funds is not a separate account or “purse”.
- It’s simply a calculation that displays the amount available for printing and copying.
Formula:
- My Funds = Free Balance + User Funds
Printing Eligibility
- You can print when My Funds > $0.
- Printing is automatically blocked if My Funds ≤ $0.
-
Free Balance
-
Printing and copying usually stops automatically when your available My Funds balance is insufficient for a print job. However, some jobs may continue even after your balance reaches zero, which can result in a negative balance.
Ask staff for help if this happens.
-
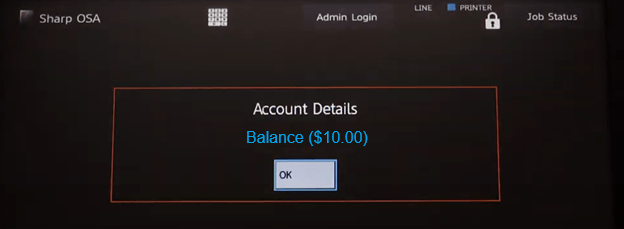
Parentheses indicate a negative balance.
Example: ($10.00) = -$10.
When your balance is negative, printing and copying will be blocked. Please ask staff for assistance.


Making Copies
-
- Log in with your library card number and PIN.
- Place your document on the glass or in the top feeder, face up.
- Tap Copy.
- Choose the number of copies.
- Tap B/W Start or Color Start to begin copying.
-
Each month a $20 credit is applied to your library card that can be used for printing and copying. Unused balances do not roll over at the end of the month.
Black and white 8.5" x 11" pages are $0.10 per page and color pages are $0.50 per page. A double-sided page counts as two pages.
If you need to print or copy more than your $20 monthly credit will cover you may pay for the difference. Please speak to library staff in advance of making excess copies to submit payment.
Scanning & Faxing
-
Scanning and faxing are available at all TRL print stations at no charge.
- Place document on the glass or in the top feeder, face up.
- Log in with your library card number and PIN.
- No card? See staff for assistance.
- Tap Scan/Fax.
- Tap Address and enter your destination:
- Scanning: enter your email address.
-
Faxing: enter the fax number + @egoldfax.com
(example: 3605555555@egoldfax.com).
- Tap B/W Start or Color Start.
Scanned documents are emailed as attachments.
Need help? Library staff are available to assist.
-
Yes! Scanning and faxing are available at all TRL print stations at no charge.
General How-To
-
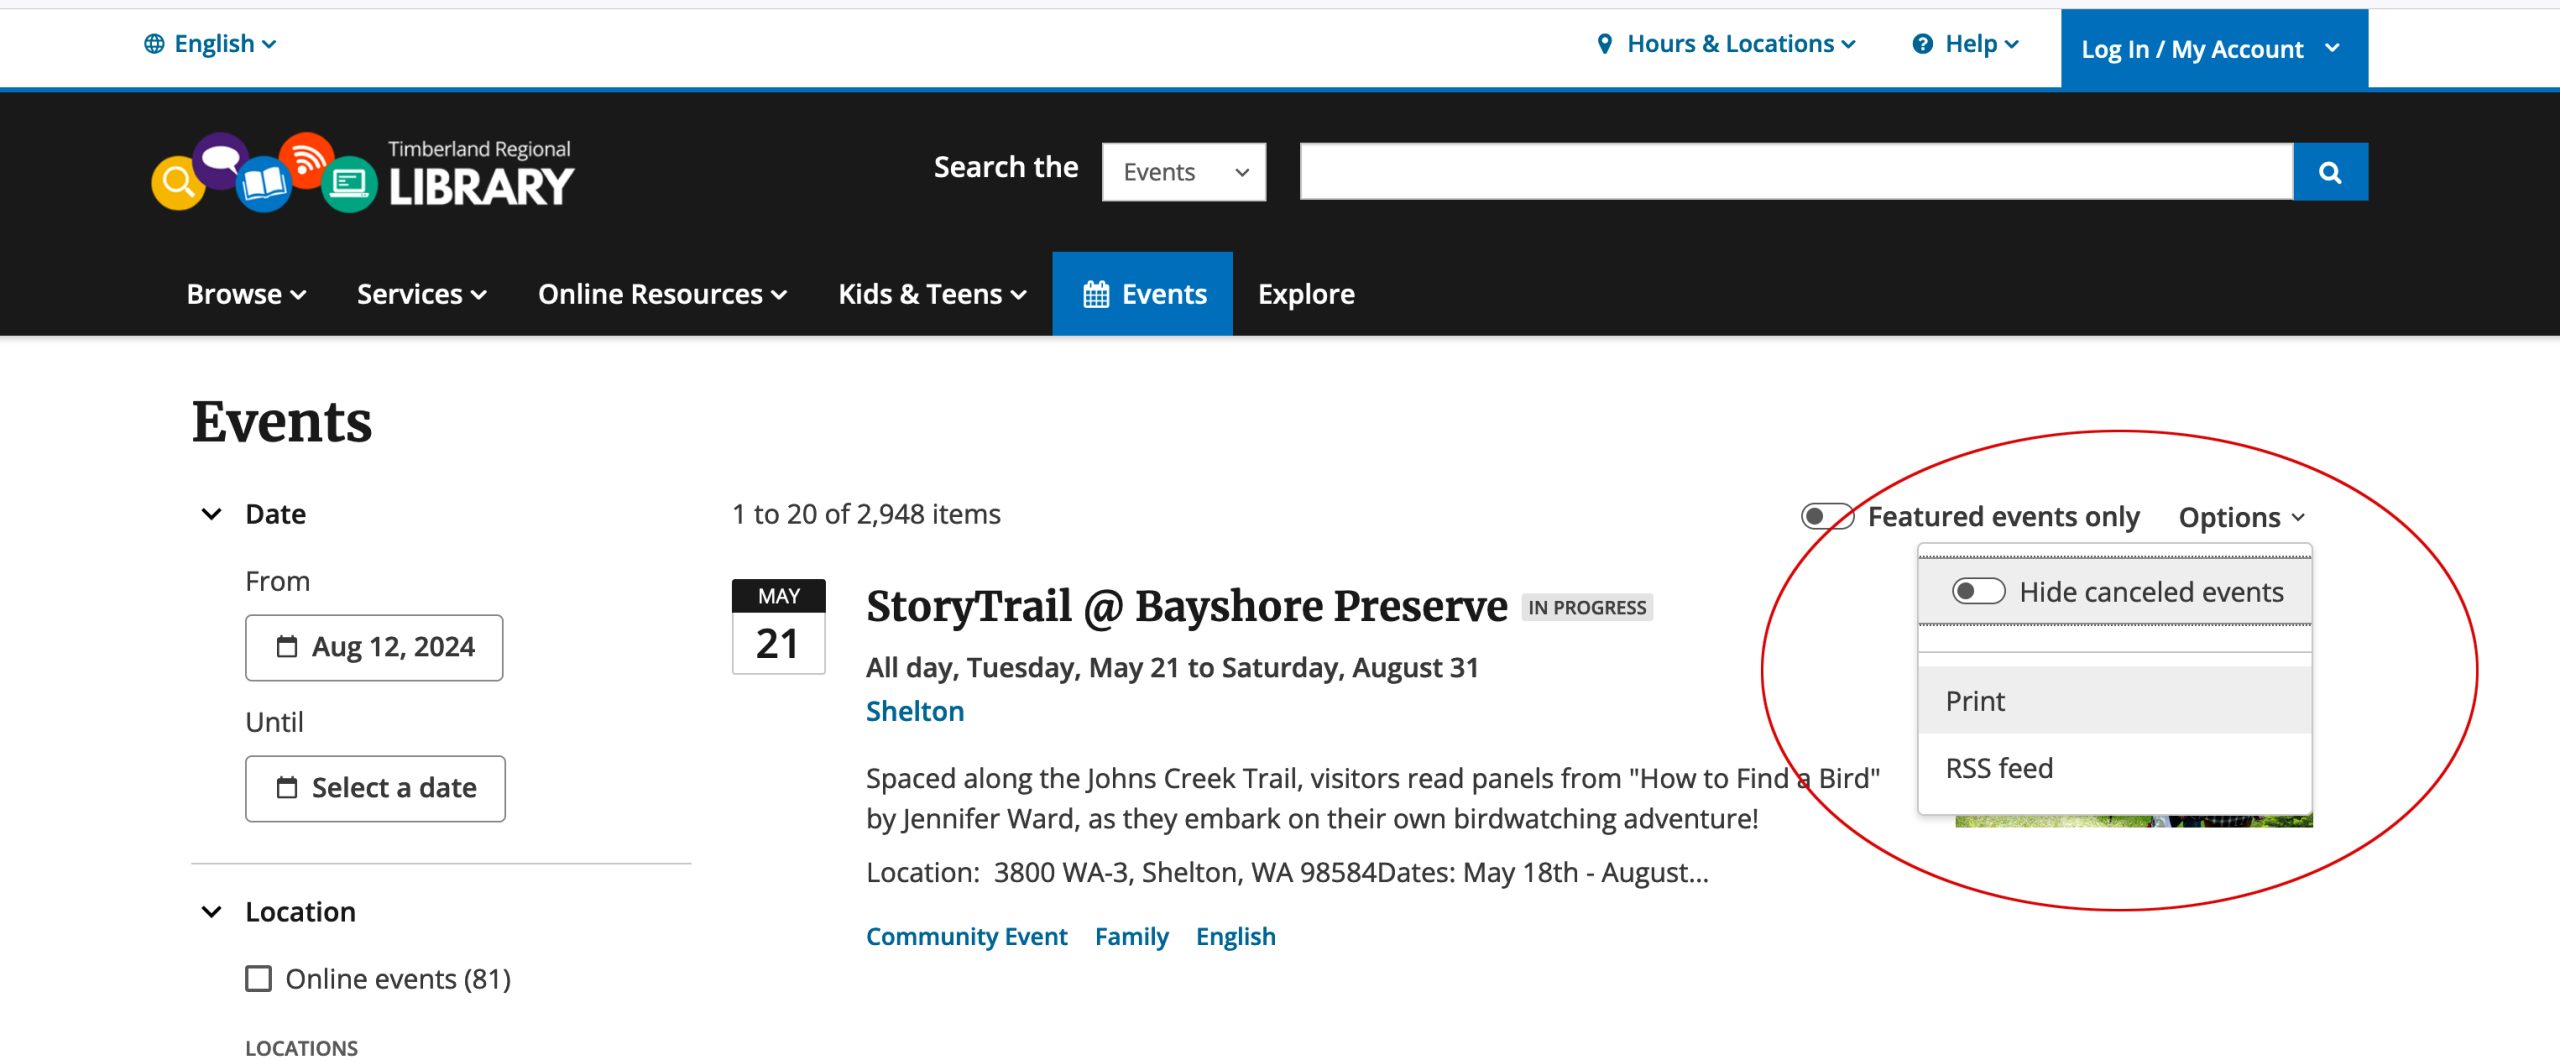
Yes! Visit our website and navigate to the events calendar. Select your "dates" 'Locations" and "categories" to personalize your search. Once you've made your selections click on the "Options" tab and select "Print".
-
Some password protected PDF documents are incompatible with our printing system. This is a known issue by our vendor and can occur when using computers in the library or uploading files to from your own device. However, a work-around does exist for printing these files.
- In Google Chrome, open the PDF file.
- Navigate to File -> Print.
- When the print screen comes up, click Change to choose a different output destination.
- When the Select a destination dialog pops up, choose “Save as PDF”.
- You’ll be returned to the print preview screen again. This time, click the Save button.
- After the Save As… dialog box comes up, leave the defaults in place and click Save.
- When it’s done processing, minimize Chrome and double-click the newly created PDF to open it in Adobe Reader.
- Navigate to File -> Print and click the Print button. This will send your password protected PDF to a printer. You may then choose to log in to any print release station to release the job.
-
iPhones save images as .HEIC files by default, which Pharos does not support.
Convert them to JPEG before uploading:
iPhone
- Create a folder for JPEGs
- Open Files app > tap the three dots > select New Folder
- Convert images
- Open Photos app > Select images > Share > Copy Photos
- Paste as JPEG
- Open Files app > open your new folder
- Tap & hold in middle of screen until you see options appear
- Select Paste (the image will automatically be converted to jpeg when pasted)
Mac
- Select the images
- Right-click > Quick Actions > Convert Image
- Click Convert to JPEG button
After converting, upload and release your images at a print station.
- Create a folder for JPEGs
-
No. To use an internet computer, print to a TRL printer, or make copies on a TRL copier, you are required to use your own TRL Library Card or Internet Card. You can apply for a Library Card or Internet Card online or at any TRL library. Refer to the Computer Use Rules for more information.
Troubleshooting
-
Before you can log in to a print station with your new library card number, the new account must be linked with the Pharos printing system by logging in to Pharos My Print Center at least once with the new library card number and PIN.
What to do:
- Visit printing.trl.org.
- Log in with your library card number and PIN.
- After this first login, you’ll be able to use any print station.
-
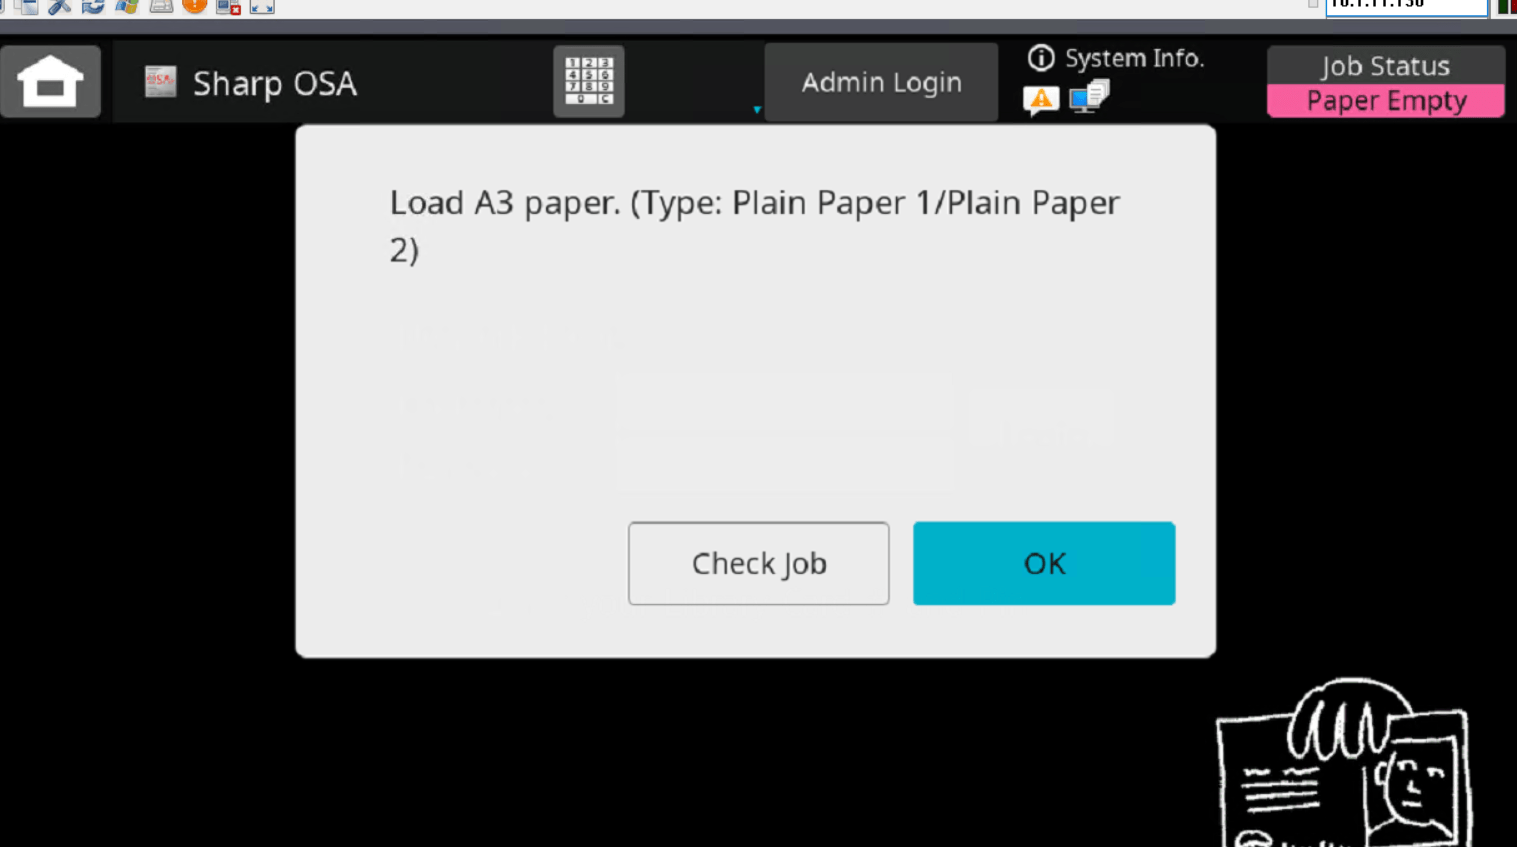
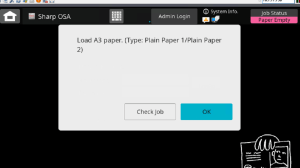
Your document may be set to a paper size we don't stock.
- Our printers use 8.5"×11" and 11"×17".
- Options:
- Click OK to close the error message, then tap Change Paper Size on the copier to force the print (may crop), or
- Change the document's paper size setting before uploading for best results.
 , opens a new window
Error message that states "Load A3 paper" -
Your email address may still be linked to an old library card in the Pharos print system.
Options:
- Send the documents using a different email address and register it with Pharos, or
- Ask staff for help updating your account.
-
- Open the file or webpage that you would like to print.
- Open the Print settings by doing one of the following:
- Navigate to File > Print OR
- Use the keyboard shortcut: "Ctrl" key + "P" key.
- In the Print Settings: select the Fit to page option.
- Click Print.
The files are now ready to be released at a print station.